CorelDraw
From __space Wiki
Primarily for use with laser and vinyl cutter.
Contents
Learning to use CorelDRAW
CorelDRAW is mainly used to create vectors and how it is used varies slightly when using it to create a vector for the Laser Engraver and the Vinyl Cutter. Detailed instructions on how to used CorelDRAW for both hardwares are in the their respective pages. This page's objective is to combine the information in those pages into one condensed guide for easy access.
Learning to use CorelDRAW with the Laser Engraver
- Start by opening up a blank document
- The blank page icon with the little green plus (right below the “file” option of the menu bar)
- Preparing a logo
- File > Import > Choose File (JPG., PNG., PDF….)
- Hit <enter> to place the logo right in the center of the page
- Click on your logo and then on “Bitmaps” in the upper menu toolbar
- Resolution: 300 dpi
- Color mode: Black and White
- Dithered unchecked
- Anti-aliasing checked
- Press “ok”
- Click on the new bitmap and the “Trace Bitmap” dropdown on the property toolbar
- Choose “Outline Trace”
- Choose “Detailed Logo”
- In the settings tab on the right experiment with the “Detail,” “Smoothing,” and “Corner smoothness” sliders until you can settle on something you like
- Hit “Ok”
- Resize and Center (see below)
- From here you can add more logos or pictures or move right onto setting up the print settings and Spirit LS.
- Preparing a picture
- File > Import > Choose File (JPG., PNG., PDF….)
- Hit <enter> to place the logo right in the center of the page
- Click on your logo and then on “Bitmaps” in the upper menu toolbar
- Resolution: 300 dpi
- Color mode:Grayscale (8-bit)
- Dithered unchecked
- Anti-aliasing checked
- Optional: Transparent background (makes whitespaces of the new bitmap transparent - only noticeable when placed on a background or another image)
- Press “ok”
- Click on the new bitmap and the “Trace Bitmap” dropdown on the property toolbar
- Choose “Outline Trace”
- Choose “High Quality Image”
- In the settings tab on the right experiment with the “Detail,” “Smoothing,” and “Corner smoothness” sliders until you can settle on something you like. You often don’t need to adjust these settings when working with a picture.
- Hit “Ok”
- Resize and Center (see below)
- From here you can add more logos or pictures or move right onto setting up the print settings and Spirit LS.
- Adding Text
*Can be by itself or added to and on top of logo and picture designs
- Select text box option in left-side toolbar
- Click and drag to create a box (will be resizeable)
- Type what you want
- Highlight and edit text properties (font, size, etc.) in object properties panel on right side of screen (if that panel isn’t there look for “object” in the top menu bar and choose “object properties”)
Note: all of the previous designs are created using the “line-by-line” raster style cutting. For thin-line designs, we use vector cutting. (great for outlined shapes, and especially for cutting through materials)
- Vector cutting
- There are two ways of getting vector cut designs; one is by just using the outline of a logo and the other is by doing a Centerline Trace
- Stencil/Logo outline (best for clean, thin-line art)
- Follow the steps for “Preparing a logo” as seen above all the way through
- Click on the new object and then with the left mouse button click on the Black square in the color panel on the right side of the page and then with your right mouse click on the White square. *This will give you a black outline of your logo with white fill
- Highlight the object once more and on the property bar click on the pen-size drop down menu. Select “Hairline”
- Centerline Trace (best for cutting out parts of a project)
- Convert the drawing to a black and white bitmap (as seen in “Preparing a logo” above)
- Select the new bitmap and, in the “Trace Bitmap” drop down menu on the properties bar, select “Centerline.” Choose “Technical Illustration”
- In the settings tab on the right experiment with the “Detail,” “Smoothing,” and “Corner smoothness” sliders until you can settle on something you like
- Hit “Ok”
- Highlight the object and on the property bar click on the pen-size drop down menu. Select “Hairline”
- If there is a rectangular border around your image that you don’t want to be etched with it, highlight the image and click the “Ungroup all objects” button on the property bar, then click and delete the unwanted pieces of border (must use the “pick tool” found in toolbar on left of screen)
- Resize and Center (see below)
- From here you can add more logos or pictures or move right onto setting up the print settings and Spirit LS.
- Resizing and Centering
- Resize:
- Click on the object to be resized
- Enter width into “width box” on the property bar. Hit <enter> *If the lock symbol is closed then the height will snap to match, keeping the image ratio the same.
- Enter height into “height” box. Hit <enter>
- Center:
- Click “Object” in top menu bar
- Go to “Transformations” then “Position”
- Relative Position unchecked
- Center box of 9x9 box grid selected
- Enter the x and y position (in inches) of the center of your document *X = ½ * width of page (usually 4.25”) *Y = ½ * height of page (usually 5.5”)
- Resize:
- Now your image is ready for the printing section of Laser Engraver
Using CorelDRAW with the Vinyl Cutter
- Add in an image by importing it (Png,jpg,bmp etc) or by using the Ctrl+ I shortcut.
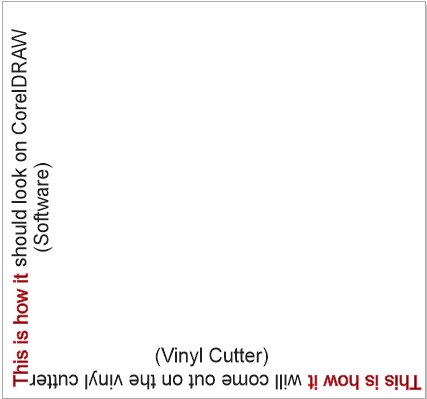
- To properly position the image for the vinyl cutter, please have your images starting from the bottom left to the top left. An example of how it should look is:
- Next hit f12 to create an outline over the the image to be cut. if there are multiple things you must do this for each individual image.
- After that you can select your file and select "Trace Bitmap" on the top toolbar. Select "Outline Trace," then "Detailed Logo." If this is not an option go to "Bitmaps," "Outline trace," "Detailed Logo." Make necessary changes under the "PowerTRACE" menu. When finished select "OK". Select your image again and run through the "Outline Pen" shortcut once more. Your file should now be traced.
- Your file will now be ready for the printing instructions in the Vinyl Cutter page.

Tips and Tricks
- By holding the ctrl and shift key you can distort your image with the pick tool.
- If you hold the left mouse button on an icon in the tool kit you can see more options on what the tools can do.
- For example the pick tool has a free transform tool in the hidden menu.
- If you wish to save your file as a regular file type, be sure to export it, other wise the file will be saved as a .CDR(CorelDRAW file type)