Prusa i3 MK2
Under Construction. Please bear with us while we update our wiki. Thank you.
The Maker Select v2, Prusa i3, and Prusa i3 MK2 are open source 3D printers which are capable of printing with the following materials, acrylonitrile butadiene styrene (ABS), polylactic acid (PLA), high impact polystyrene (HIPS), polypropylene and nylon.
- This procedure works for all three printers, the Maker Select v2, the Prusa i3 and the Prusa i3 MK2.
- You can use various applications to prepare your product for these printers. Our default application is Simplify 3D (instructions below).
Contents
Specifications
Maximum Design Size: 42 x 42 x 38 cm (16.5 x 16.5 x 15 inches)
Layer Thickness: 70 W (printing PLA) or 100 W (printing ABS)
Creating a .gcode File
In order to print using these 3D printers, you will need to save your project (.stl or .obj) as a .gcode file. To do this, you will need both a (Micro) SD card and a (Micro) SD to USB adapter. The adapters are located near the Prusa i3 MK2 3D printer in a glass cup.
- Place the (Micro) SD into the SD to USB adapter and plug it into any of the available computers with Simplify 3D.
- Open the file to be sliced in Simplify 3D. This can be done by right clicking on the file and selecting "Open with Simplify 3D" or by importing your file through the Simplify 3D application: File>>Import Models (Crtl+I).
- Once the file is in Simplify 3D, there are two main settings to be adjusted, the process settings and the object settings.
Editing the Process Settings
These are the printer's settings. Select "Edit Process Setting" located near the bottom left corner to start.
- Begin by making sure the correct printer is selected (Select Profile):
- Maker Select v2 (Use Prusa i3 settings)
- Prusa i3
- Prusa i3 MK2
- Check to see if PLA is listed as the "Auto-Configure for Material"
- Run through all the tabs and ensure that the proper settings have been updated:
- Extruder (This should be left alone)
- Layer (This should be left alone)
- Additions (Edit as desired)
- Infill (Typically 20%)
- Support (Enable if there are any overhangs in the print)
- Temperature (Extruder: 205-210c Bed: 60c)
- Cooling (Prusa i3 MK2 only set Fan Speed to 30 near Layer 2)
- Advanced (Check to make sure "Start printing at height" and "Stop printing at height" are not selected)
 *The remaining tabs should be fine left alone.
 *Hover over each category in Simplify 3D, with the mouse cursor, to learn more about each individual setting.
- When finished select "ok" to close the process settings.
Editing the Object Settings
These are the object's settings. Double click on the object to start, a new menu should appear on the right side of the application.
- The first section is the "Change Position" section:
- X Offset
- Y Offset
- Z Offset
These will change the position where the object will be printed on the bed. An easier way to change the position is to hold the 'Crtl' key, left click, and drag the object around the bed.
- Although the position of the object may be specified by the user, it is recommended to use the "Center and Arrange" button located on the left side under "Models." This will arrange every object relative to the center of the printer's bed.
- The second section is the "Change Scaling" section:
- X Size (mm) and Scale (%)
- Y Size (mm) and Scale (%)
- Z Size (mm) and Scale (%)
These will scale the object, increase or decrease the size, in the direction specified. Usually "Uniform Scaling" is selected so that the scale is proportional. Another way to increase or decrease the object's size is to hold the 'Crtl' key, right click on the object, and drag the cursor outward or inward respectively (if the object is selected in its center, the cursor cannot move inward, thus it cannot decrease the size).
- The final section is the "Change Rotation" section:
- X Rotation (deg)
- Y Rotation (deg)
- Z Rotation (deg)
This will adjust, as the name suggests, the rotation of the object. This is useful when trying create good contact between the printer's bed and the object being printed, and to minimize support structures. It is recommended to place the flattest portion of the object down on the bed. If printing an Erlenmeyer flask for example, make sure the flat bottom is on the bed and the opened neck is faced upward. If the flask was placed with the neck on the bed, the printer would need to print support so that the top (the actual bottom of the flask if held upright) of the flask can be printed. This can be considered a waste of filament because the print could be done without any supports.
- When finished select "Done" to close the settings.
- On the right most side of the program there is column with 15 options:
- Normal Selection (Q)
- Translate Models (W)
- Scale Models (E)
- Rotate Models (R)
- Default
- Top
- Front
- Side
- Coordinate Axes
- Solid Model
- Wireframe
- Show Normals
- Cross Section
- Machine Control Panel
- Customize Support Structures
The first for items on the list allow the user to move the screen around, move, scale, and rotate the object respectively. The next for items alter the viewing angle of the object. Skipping to the last item, as the other options are for the more advanced users, this allows the user to manually apply support in areas where Simplify 3D failed to generate.
Preparing to Print
When all the settings have been reviewed and the object adjusted, select "Prepare to Print!"
- A Preview Mode will appear. Here following can be viewed:
- Build table
- Toolhead
- Travel moves
- Retractions
- The preview can display three modes:
- Feature Type
- Movement Speed
- Active Toolhead
It is recommended to run through the preview so that if there are any issues, they can be spotted. To do this, drag the blue maker on the "End" line from left to right. Check to see if there are any overhangs which do not have a support structure, if so, go back and manually input them in. Also check to see that the object is flush with the bed to ensure proper adhesion.
- Build Statistics is located on the top right portion of the program. This will display:
- Build time
- Filament length
- Plastic weight
- Material cost
- When ready, select "Save Toolpaths to Disk"
- locate the (Micro) SD card and save the .gcode to the card
- Wait to see "Toolpaths successfully exported to:..." on the bottom left corner of the program before removing the (Micro) SD card
Printing Using the Maker Select v2
- Once your file is saved to a Micro SD removable drive, you can now properly eject the removable drive and bring the drive to the Prusa MK2 printer.
- Toggle the switch to "On" in the back of the Prusa operations box located to the left of the printer.
- Remove the Micro SD from the Micro SD to SD adapter, place it in the slot on the right hand side of the operations box. The slot is labled "SD."
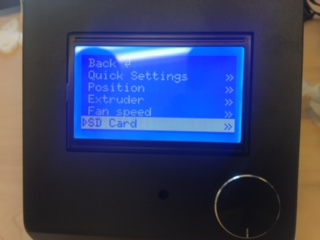
- Press the dial on the front of the operations box to open the Prusa menu
- Using the dial, navigate down to "SD Card" and tap to select.
- Follow the following menu prompts:
- Mount SD Card
- Print File
- This will show you a list of the .gcode files located on your Micro SD. Select the file you wish to print.
- Press the dial to print
- The first section is the "Change Position" section:
