Difference between revisions of "Create a Terrain in Unity"
m (→Adding Texture to the Terrain) |
m |
||
| (41 intermediate revisions by 2 users not shown) | |||
| Line 1: | Line 1: | ||
| − | If | + | If using one of the lab computers, start by opening Unity. Go to Projects and choose "EventProjectTemplate" from the list. |
| − | + | If you don't have access to a lab computer at _Space.URI or want to complete this on your own, you can download the template [https://drive.google.com/file/d/1gWoo32URu7tIfUMMqhSthSeCFKqcmV3a/view?usp=sharing here]. | |
| − | |||
| + | In the "Project" tab right-click on "Empty World", (in "Assets") pick "Show in Explorer". Right click again on "Empty World", copy and then paste inside "Assets". Right click and go down to "Rename" and '''rename''' the scene, this is done to avoid conflicts with other scenes, which may result in deleting other scenes. Once the new scene is saved, go back to the "Project" tab and open the newly duplicated scene by double-clicking on it. It should appear as a new item in your "Assets" folder. | ||
| + | ===Manipulation of the Camera=== | ||
| + | To pan the camera hold down middle mouse wheel and move the mouse around. You can also rotate the camera by holding down the "Alt" key, Left click, and moving the mouse around. | ||
| − | To create | + | ==Create the Terrain== |
| + | To create a terrain, right-click anywhere in the tab labeled, "Hierarchy" and a new menu should appear (see below, the blue dot is an example where to right-click). | ||
| + | [[File:createTerrain.png]] | ||
| + | |||
| + | Then, go down to "3D Object", and from the sub-menu that appears, choose "Terrain". Once selected, a large blank plane should appear. Select it, and various options appear in the "Inspector". (If there is any confusion as to where all these tabs are, refer to [http://space.apps.uri.edu/wiki/index.php?title=Getting_Started_-_No_Scripting#Overview_of_editor_and_various_tabs this guide]). | ||
[[File:newTerrain.png|800px]] | [[File:newTerrain.png|800px]] | ||
| + | |||
| + | Make sure to rename your newly added "Terrain" in the "Project" tab! Do this by double clicking on the name in the "Project" tab, with the second click being longer. | ||
| + | |||
| + | Next you should center the terrain's position, go to "Inspector", the tab in the upper right, and in the "Transform" area, there is a line labeled "Position" where you can change the XYZ position of a selected object. Type in -249 for the x value, -5 for y, and -250.9 for the z. | ||
| + | |||
=Editing Terrain= | =Editing Terrain= | ||
==Hills and Valleys - Adjusting Terrain Height== | ==Hills and Valleys - Adjusting Terrain Height== | ||
| + | Select the terrain icon which has an up arrow. Make sure "Opacity" is above zero, as this affects how big the hills are. The brush size can also be changed to make larger mountain ranges. | ||
| + | |||
| + | Once adjusted, left click (or click and drag to make continuous formations) anywhere on the terrain plane to raise it at that point. Pressing the "shift" key while clicking will lower that part of the terrain, though it will not go below the terrain's initial level, regardless of the y coordinate. | ||
| + | |||
[[File:raiseTerrain.png]] | [[File:raiseTerrain.png]] | ||
[[File:terrainHeight.gif]] | [[File:terrainHeight.gif]] | ||
| − | |||
| − | |||
==Adding Texture to the Terrain== | ==Adding Texture to the Terrain== | ||
| Line 21: | Line 34: | ||
[[File:defaultTerrain.gif]] | [[File:defaultTerrain.gif]] | ||
| − | Add a texture to paint with by going to Edit Texture, | + | Add a texture to paint with by going to "Edit Texture", "Add Texture", then click "Select" located within "Albedo (RGB) Smoothness (A)". Find and choose a texture for the terrain ('''Note''': To enlarge the images in the selection window, use the slider on the top right corner of that selection window). Once chosen, double click on the image and when prompted, select add. Before doing any painting, set "Target Strength" and "Opacity" to anything above zero. |
| + | |||
| + | '''Brush size''' is the size of the area that will be affected by clicking on the terrain once. | ||
| + | |||
| + | '''Opacity''' is the transparency or amount of texture applied for a given amount of time you paint. | ||
| + | |||
| + | '''Target Strength''' is the maximum opacity that can reach by painting continuously. | ||
| + | |||
| + | The first texture added becomes the default for the entire terrain. To add another texture, different from the first one, you can paint over the default with the newly added one. A blue outline will indicate which texture is selected. | ||
[[File:paintTerrain.gif]] | [[File:paintTerrain.gif]] | ||
=Trees and Plants= | =Trees and Plants= | ||
| − | + | First, select the Tree icon. [[File:treeIcon.png]] | |
| − | Using the brush to place trees | + | ==Add a Tree== |
| + | Pick Edit Trees > Add Trees, and then when the window comes up, use the file picker (circled below) to choose "Broadleaf_Desktop" , "Broadleaf_Mobile" , "Conifer_Desktop" , or "Palm_Desktop". | ||
| + | |||
| + | [[File:addTree.png]] | ||
| + | |||
| + | ==Using the brush to place trees== | ||
| + | '''Brush size''' is how large the area will be like to paint with for 1 click. | ||
| + | |||
| + | '''Tree Density''' is how many trees will get placed in the circle when clicking or moving the mouse while clicking and dragging. Shift click to remove trees in the area you click with a radius of the chosen brush size. | ||
[[File:trees2.gif]] | [[File:trees2.gif]] | ||
| + | |||
| + | If you'd like to learn more about Unity, please refer to our more detailed [http://space.apps.uri.edu/wiki/index.php?title=Learn_Unity_First tutorial!] | ||
=Test it out!= | =Test it out!= | ||
==Normally== | ==Normally== | ||
| − | + | The new terrain can be viewed by pressing the play button at the top middle of the editor. [[File:playButton.png]] | |
| − | |||
==On the Vive== | ==On the Vive== | ||
| − | + | The new terrain can also be viewed on the HTC Vive, by first clicking on the collab button. | |
[[File:collabButton.png]] | [[File:collabButton.png]] | ||
| − | Then press publish. | + | Then press publish. If any prompts come up asking to save the scene, do so. |
| − | Next, go over to the computer the Vive is hooked up to, | + | Next, go over to the computer the Vive is hooked up to, open Unity, and load up EventProjectTemplate. If the Collab button has an orange arrow next to it (as in [[File:orangeCollab.png]]), click on it and update the project (this will make sure your new scene shows up in the Assets folder). Open the scene, press play, and put on the headset to try it out! |
| − | |||
| − | |||
| − | |||
Latest revision as of 17:54, 28 February 2018
If using one of the lab computers, start by opening Unity. Go to Projects and choose "EventProjectTemplate" from the list.
If you don't have access to a lab computer at _Space.URI or want to complete this on your own, you can download the template here.
In the "Project" tab right-click on "Empty World", (in "Assets") pick "Show in Explorer". Right click again on "Empty World", copy and then paste inside "Assets". Right click and go down to "Rename" and rename the scene, this is done to avoid conflicts with other scenes, which may result in deleting other scenes. Once the new scene is saved, go back to the "Project" tab and open the newly duplicated scene by double-clicking on it. It should appear as a new item in your "Assets" folder.
Contents
Manipulation of the Camera
To pan the camera hold down middle mouse wheel and move the mouse around. You can also rotate the camera by holding down the "Alt" key, Left click, and moving the mouse around.
Create the Terrain
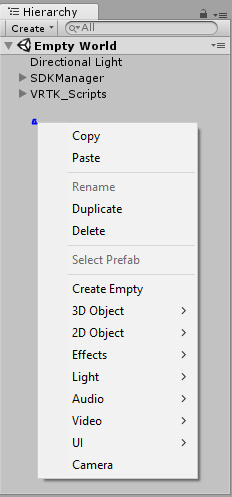
To create a terrain, right-click anywhere in the tab labeled, "Hierarchy" and a new menu should appear (see below, the blue dot is an example where to right-click).
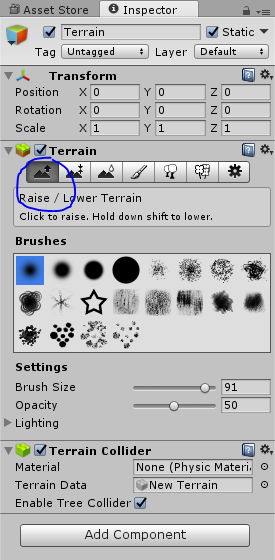
Then, go down to "3D Object", and from the sub-menu that appears, choose "Terrain". Once selected, a large blank plane should appear. Select it, and various options appear in the "Inspector". (If there is any confusion as to where all these tabs are, refer to this guide).
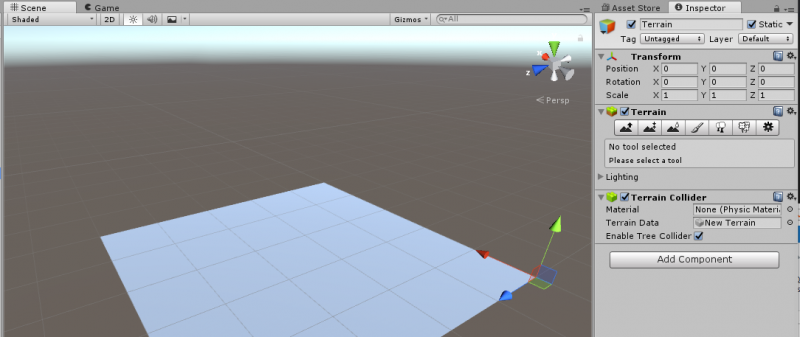
Make sure to rename your newly added "Terrain" in the "Project" tab! Do this by double clicking on the name in the "Project" tab, with the second click being longer.
Next you should center the terrain's position, go to "Inspector", the tab in the upper right, and in the "Transform" area, there is a line labeled "Position" where you can change the XYZ position of a selected object. Type in -249 for the x value, -5 for y, and -250.9 for the z.
Editing Terrain
Hills and Valleys - Adjusting Terrain Height
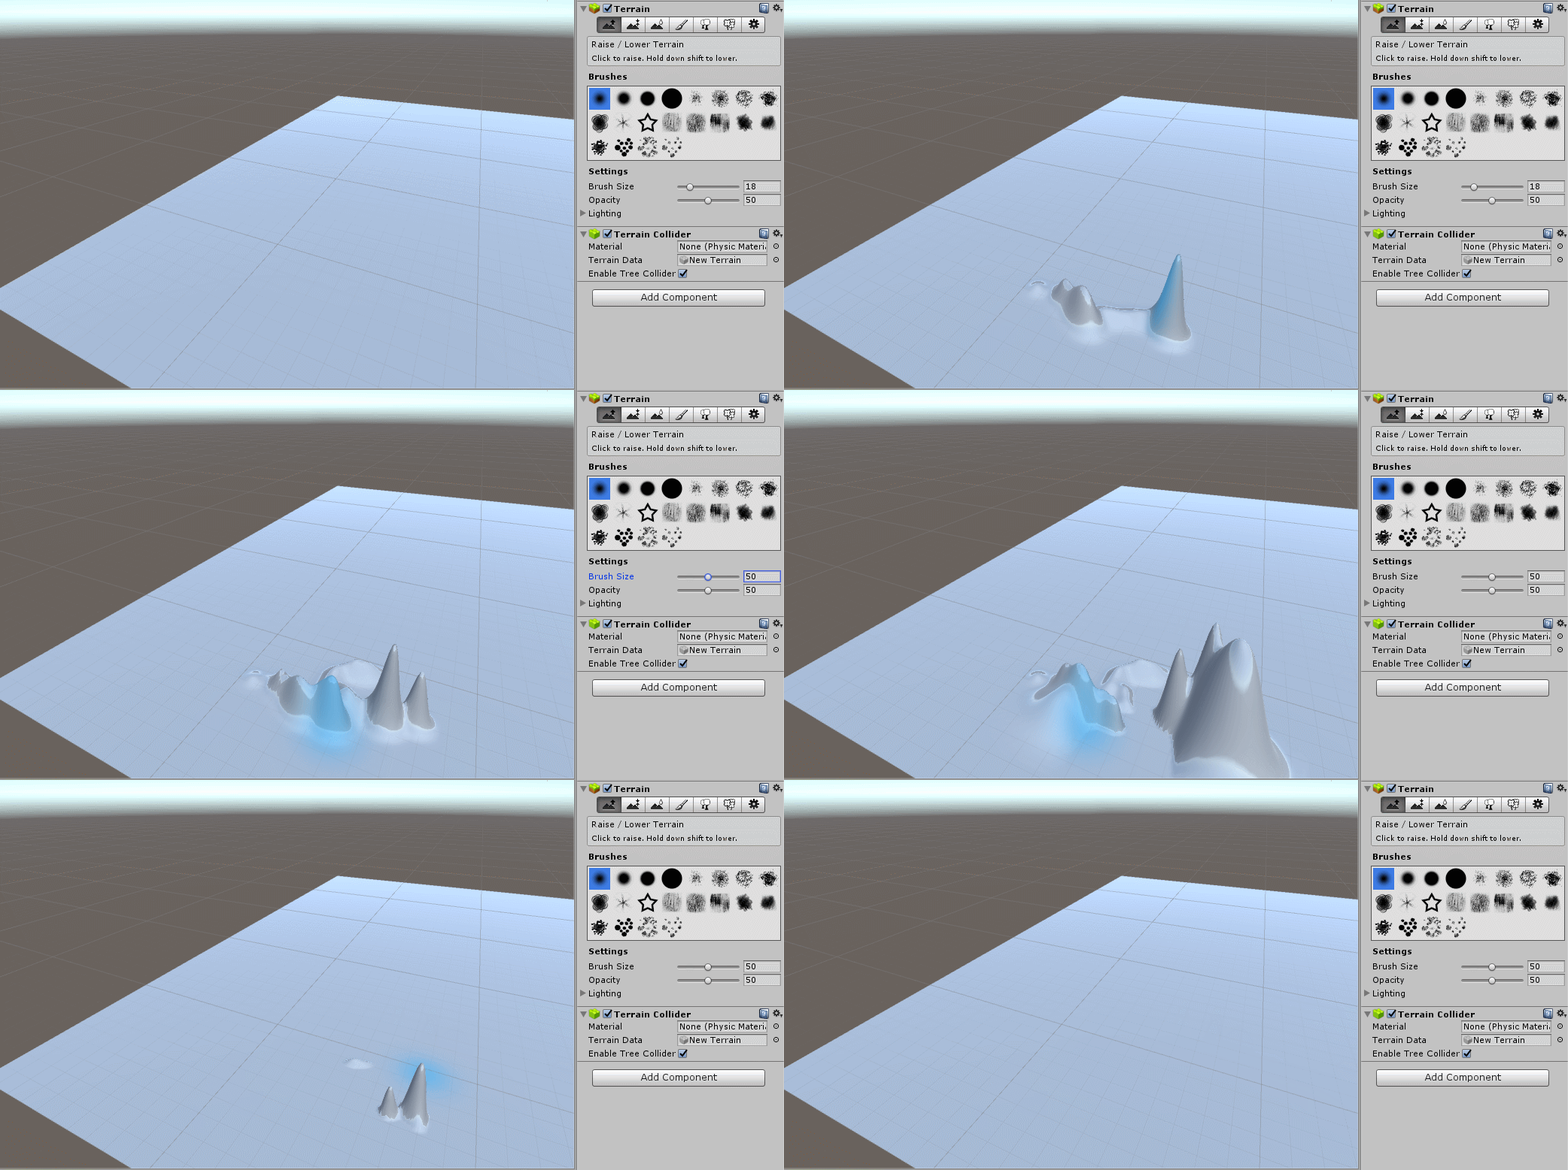
Select the terrain icon which has an up arrow. Make sure "Opacity" is above zero, as this affects how big the hills are. The brush size can also be changed to make larger mountain ranges.
Once adjusted, left click (or click and drag to make continuous formations) anywhere on the terrain plane to raise it at that point. Pressing the "shift" key while clicking will lower that part of the terrain, though it will not go below the terrain's initial level, regardless of the y coordinate.
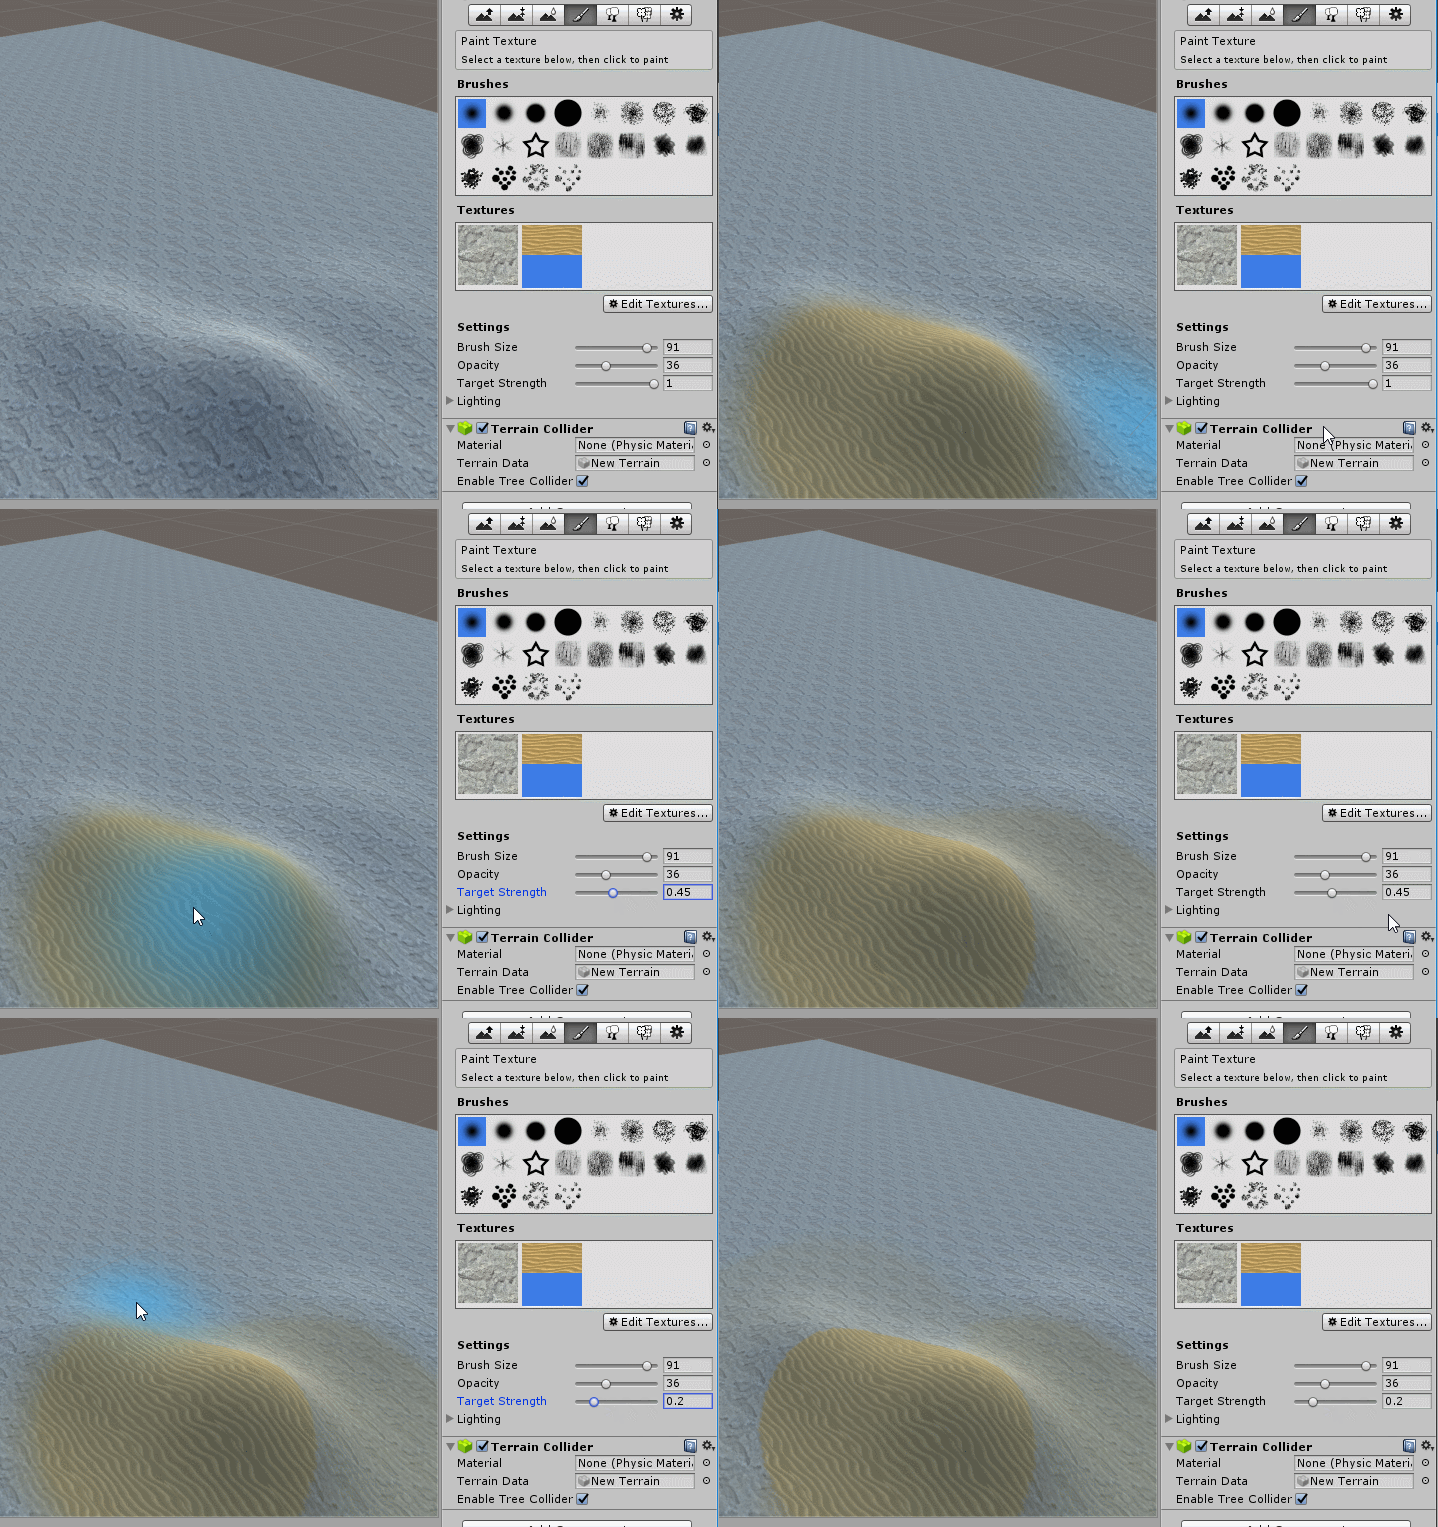
Adding Texture to the Terrain
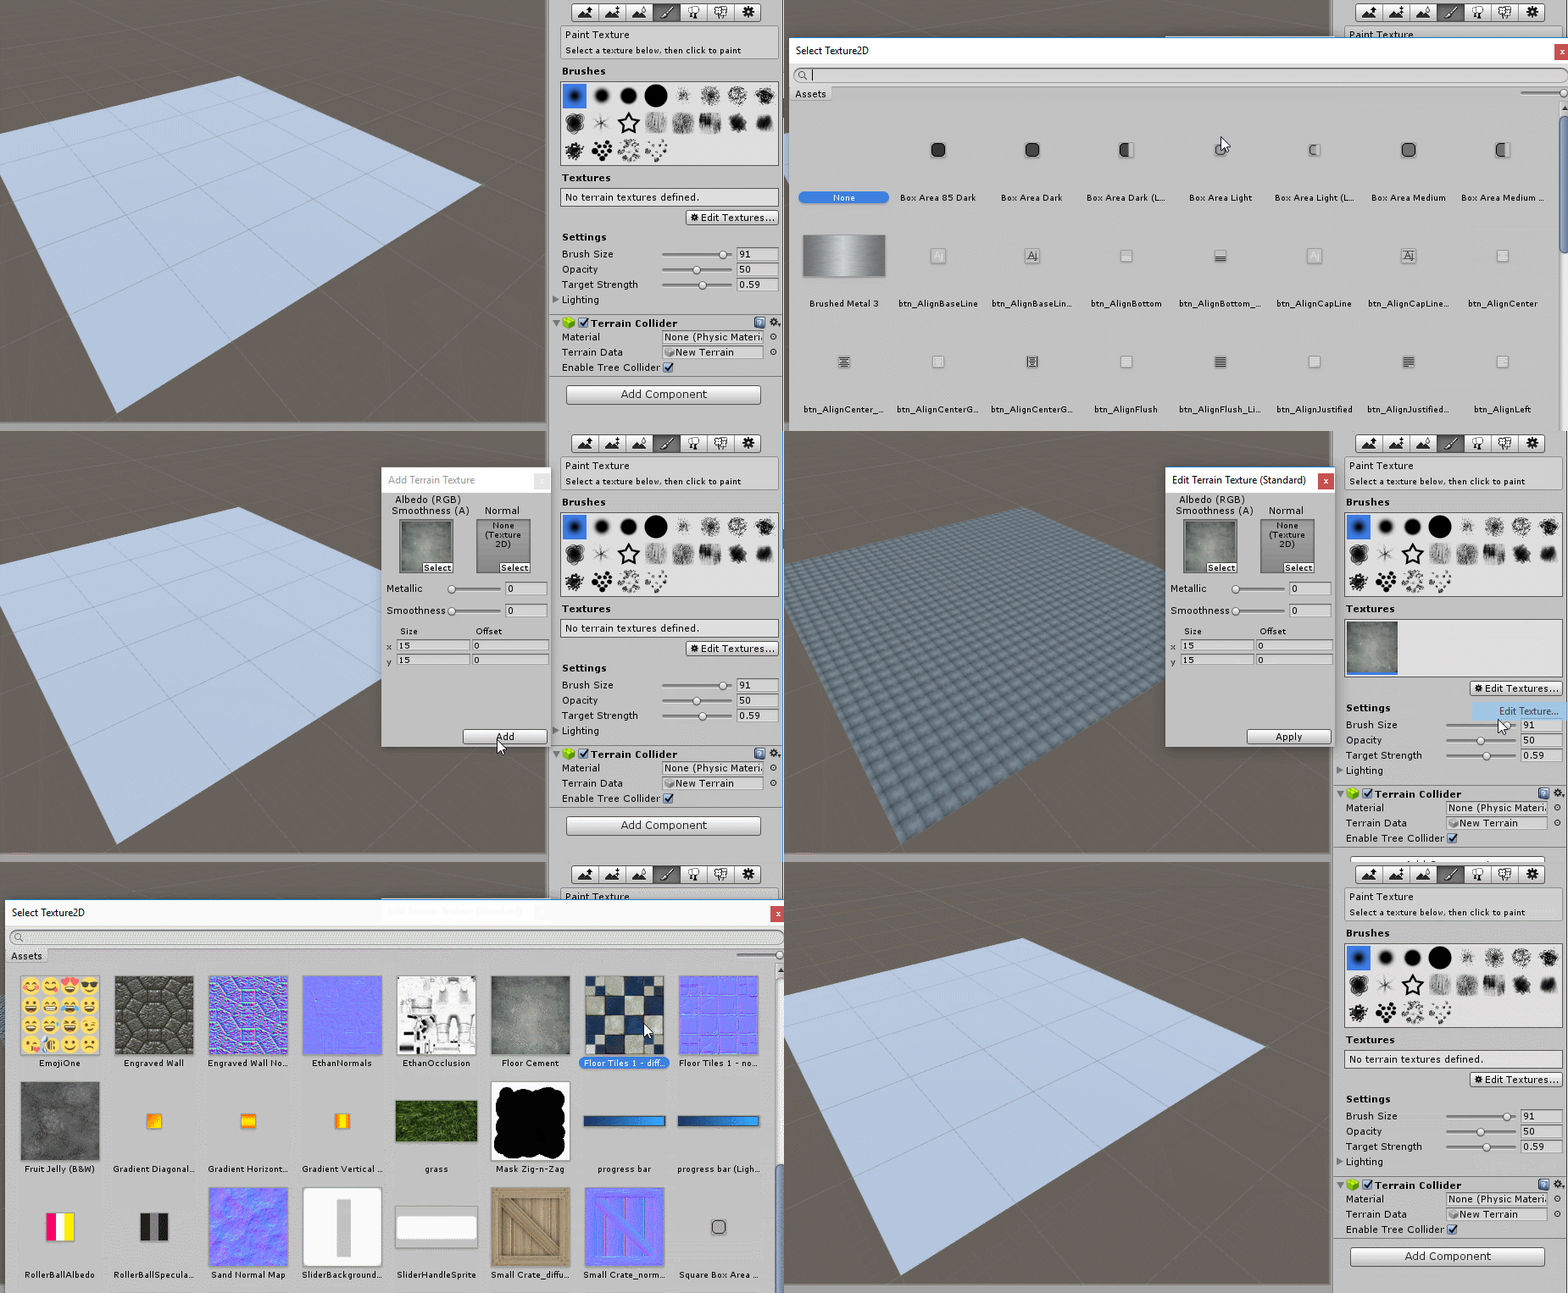
Pick the paintbrush icon from the terrain toolbar. 
Add a texture to paint with by going to "Edit Texture", "Add Texture", then click "Select" located within "Albedo (RGB) Smoothness (A)". Find and choose a texture for the terrain (Note: To enlarge the images in the selection window, use the slider on the top right corner of that selection window). Once chosen, double click on the image and when prompted, select add. Before doing any painting, set "Target Strength" and "Opacity" to anything above zero.
Brush size is the size of the area that will be affected by clicking on the terrain once.
Opacity is the transparency or amount of texture applied for a given amount of time you paint.
Target Strength is the maximum opacity that can reach by painting continuously.
The first texture added becomes the default for the entire terrain. To add another texture, different from the first one, you can paint over the default with the newly added one. A blue outline will indicate which texture is selected.
Trees and Plants
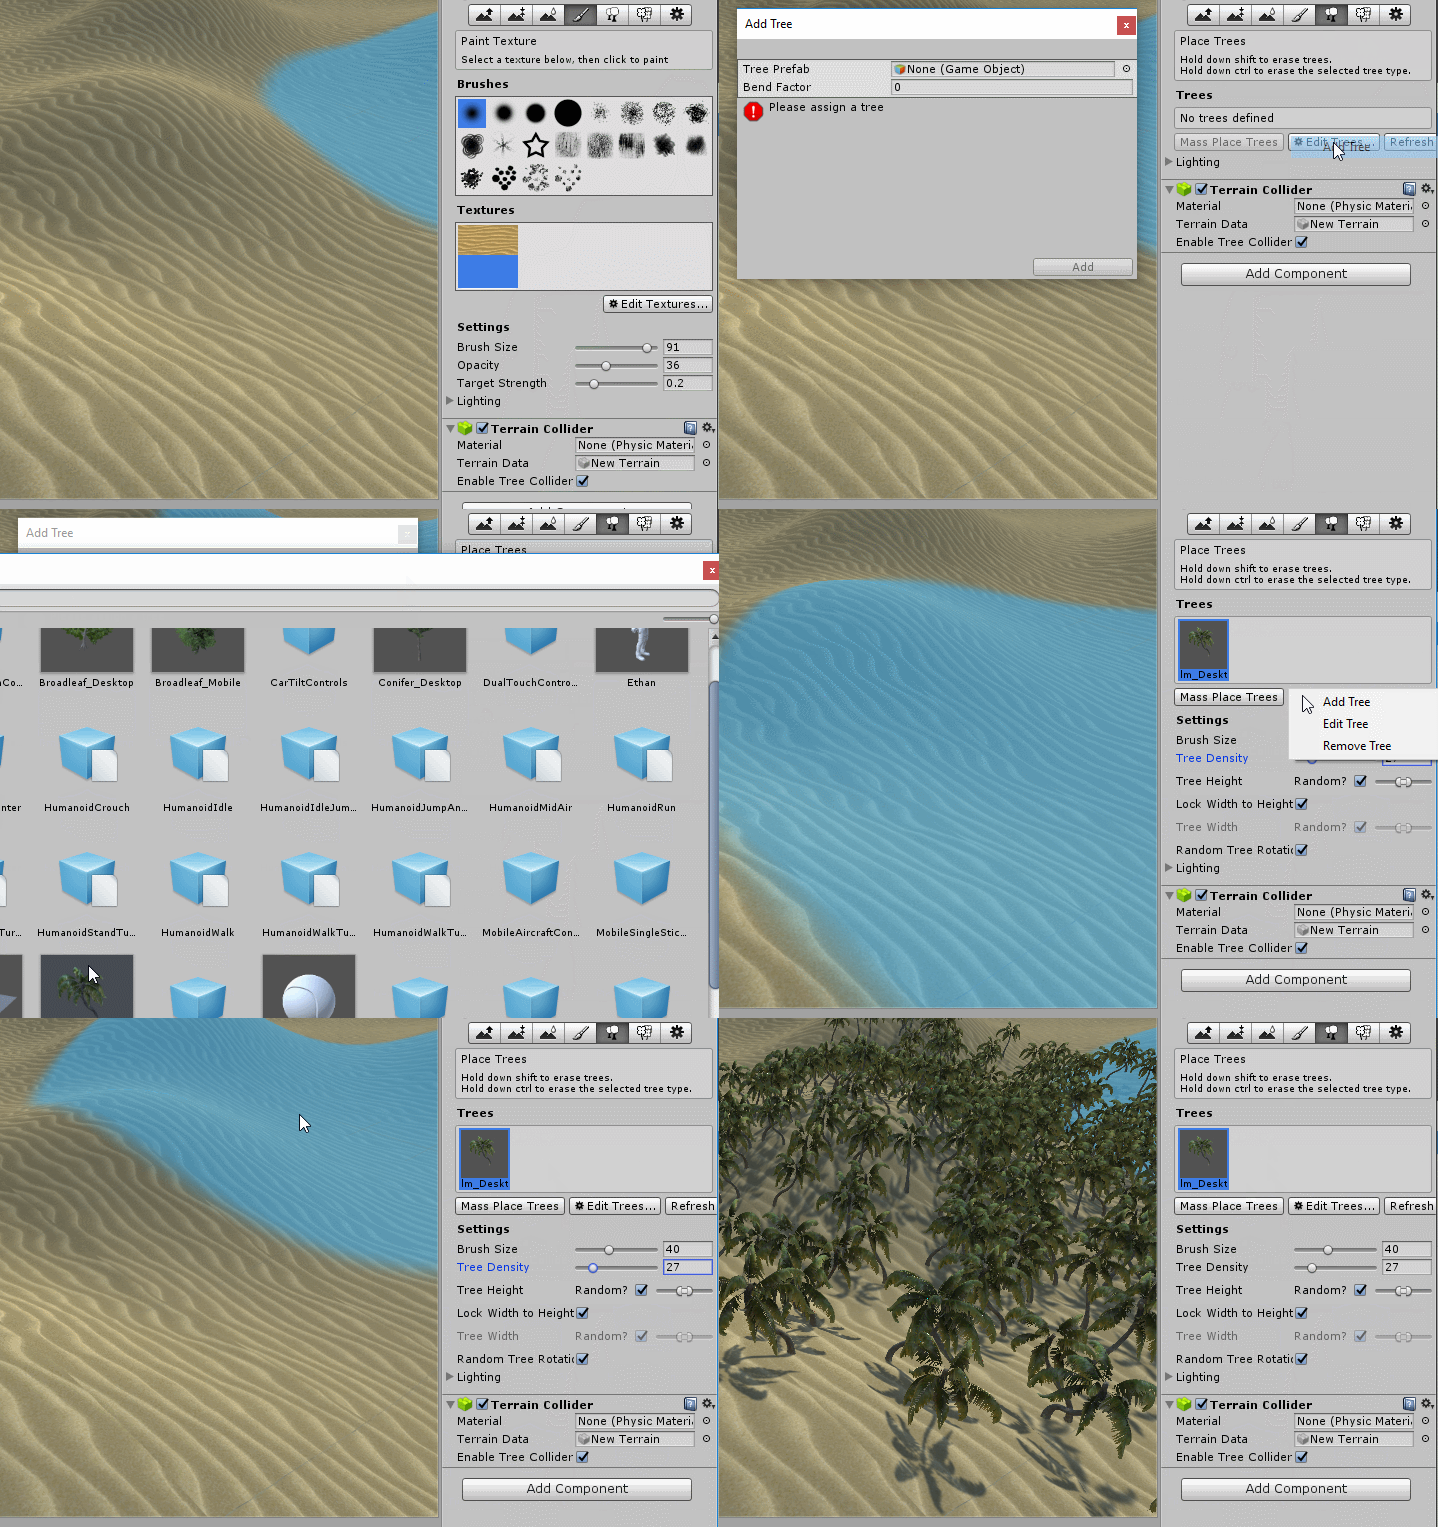
Add a Tree
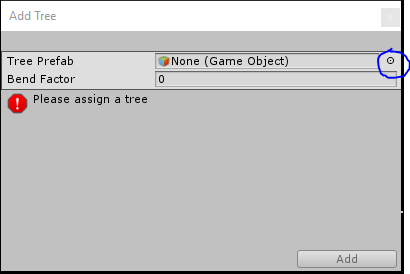
Pick Edit Trees > Add Trees, and then when the window comes up, use the file picker (circled below) to choose "Broadleaf_Desktop" , "Broadleaf_Mobile" , "Conifer_Desktop" , or "Palm_Desktop".
Using the brush to place trees
Brush size is how large the area will be like to paint with for 1 click.
Tree Density is how many trees will get placed in the circle when clicking or moving the mouse while clicking and dragging. Shift click to remove trees in the area you click with a radius of the chosen brush size.
If you'd like to learn more about Unity, please refer to our more detailed tutorial!
Test it out!
Normally
The new terrain can be viewed by pressing the play button at the top middle of the editor. 
On the Vive
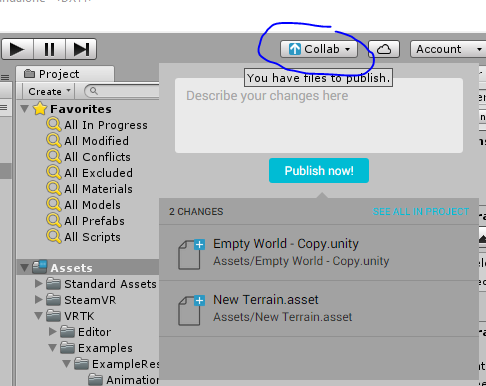
The new terrain can also be viewed on the HTC Vive, by first clicking on the collab button.
Then press publish. If any prompts come up asking to save the scene, do so.
Next, go over to the computer the Vive is hooked up to, open Unity, and load up EventProjectTemplate. If the Collab button has an orange arrow next to it (as in ![]() ), click on it and update the project (this will make sure your new scene shows up in the Assets folder). Open the scene, press play, and put on the headset to try it out!
), click on it and update the project (this will make sure your new scene shows up in the Assets folder). Open the scene, press play, and put on the headset to try it out!
