Difference between revisions of "3D Scanner"
From __space Wiki
| Line 51: | Line 51: | ||
*You can modify the exposure value to get best scene using the '''Exposure slide''' in the right-hand side of the screen. | *You can modify the exposure value to get best scene using the '''Exposure slide''' in the right-hand side of the screen. | ||
| − | *Select the '''scan''' tab | + | *Replace the calibration board with the object you need to scan modify the exposure configuration if necessary. |
| + | |||
| + | *Select the '''scan''' tab. The FlexScan3D software is smart enough to provide the optimum configuration to your scene. Check the '''Rotary''', the '''easy scan''' and the '''live scan''' boxes to benefit from its capabilities. | ||
| + | |||
| + | *Press the '''easy scan''' red button to start scanning. | ||
Revision as of 12:00, 27 February 2018
Contents
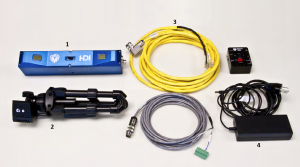
LMI Technologies HDI 100 3D scanner : Assembling units
Please see the image to get the list of items.
- Attach the HDI 100 scanner (1) to the table-top tripod (2) head by hand-tightening the head knob.
- Connect the Power and Ethernet Cordset (3) to the Power/LAN connector (4) on the scanner. Then, hand-tighten the cordset.
- Connect the Power barrel jack of the Power and Ethernet Cordset to the Power Supply.
- Connect the Ethernet RJ45 plug of the Power and Ethernet Cordset directly to the computer.
Now, the scanner is all set. Lets set up the Rotary Table (5):
- Connect the RJ11 plug of the USB to RJ11 cable (6) to the rotary controller.
- Connect the Power Supply Adapter Cable (7) to the power supply.
- Connect the USB connector of the USB to RJ11 cable to the computer.
Now, you can plug the power cords of both the scanner and the rotary table to the power supply.
Configuring the 3D scanner software
- Make sure the scanner is ON, connect the USB license key to the computer then open the FlexScan3D software.
- Go to the Scanners tab, our scanner should be read as HDI 120.
- Click on the Auto-Configure button to configure the LAN connection between the PC and the scanner (requires administrator password).
- The connection is now ready and the scanner should show some data on the right hand side of the screen.

Caution
The network connection between the PC and the scanner affects the windows default LAN connection settings. Always remember to restore the network default settings (i.e., DHCP) after finishing to avoid any conflicts.
Creating a new project
- To create a new project, select New from the Project tab. Type a project name and press OK to proceed.
- Make sure to leave a ~2.5 - 3 ft distance between the scanner and the rotary table. The scanner should be pointing to the center of the table.
- Put the calibration (checkers) board facing the scanner.
- Make sure that there's no high illumination, reflective or shiny objects between the scanner and the board or behind the board.
- Check that the checker board fully appears on the two scenes on the right-hand side of the screen with minimum RED and BLUE areas (best scene will appear in grayscale).
- You can modify the exposure value to get best scene using the Exposure slide in the right-hand side of the screen.
- Replace the calibration board with the object you need to scan modify the exposure configuration if necessary.
- Select the scan tab. The FlexScan3D software is smart enough to provide the optimum configuration to your scene. Check the Rotary, the easy scan and the live scan boxes to benefit from its capabilities.
- Press the easy scan red button to start scanning.