3D Printing -- Tutorials
Customizing a Luggage Tag (Print on Duplicator 3 or IIIP)
This tutorial can be completed on any __Space.URI workstation.
Customizing the file:
1) Open program OpenSCAD.
2) Click 'New'.
3) Click 'File, then 'Open...'.
4) Confirm you are in the folder C:/Program Files/OpenSCAD.
5) Open file Luggage Label.
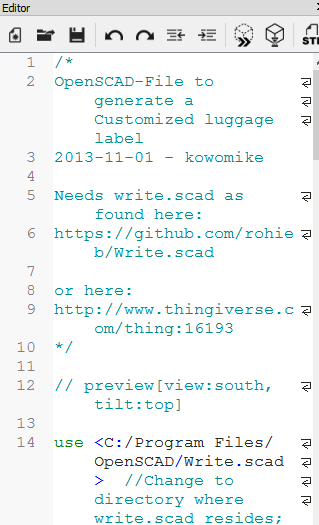
6) Confirm Line 14 in the Editor window points to; <C:/Program Files/OpenSCAD/Write.scad>, if directory is different, change it so it looks like Line 14 (Figure 1).
7) Click the compile button (outlined in red) in the Editor window (Figure 2).
8) Scroll to Line 21 in Editor window. Line 21, 22 and 23 each fit eight characters. Replace the text in quotation marks with your desired text, ensuring each line does not exceed 8 letters/spaces. Adding additional lines, while possible, is not recommended (it will make the text on the finished luggage tag smaller and decrease quality).
9) Click the compile button (Figure 2).
10) Check your spelling/layout in the main window. If something needs to be changed, make adjustment in the Editor window and click the compile button again. If you are happy with the results click the render button in the Editor window (Figure 3). Wait for the project to render (there will be a green progress bar at the bottom right of the screen).
11) When the file is done rendering click the 'STL' button in the Editor window (Figure 4).
12) In the 'Export STL File' window, rename your project. Save to the Desktop or Documents.


