Difference between revisions of "Getting Started - No Scripting"
m (→Console) |
m (→Primitive 3d objects) |
||
| Line 58: | Line 58: | ||
= Placing objects in a scene = | = Placing objects in a scene = | ||
| − | ==Primitive | + | ==Primitive 3D objects== |
| − | + | There are two ways to place primitive 3D shapes in a scene, with the first steps being different: | |
| + | one starts with right-clicking in the Hierarchy tab. | ||
| + | The other way is almost the same but starts with selecting GameObject at the top of the screen. | ||
| + | |||
| + | (The first way is shown below) | ||
[[File:placeCube.png|200px]] | [[File:placeCube.png|200px]] | ||
| − | If you pick cube, as shown | + | The second step is the same for both: go to 3D Object and choose the shape you want. |
| + | |||
| + | If you pick cube, as shown in the image above, two things happen: one, a cube is added to the lists of objects in the hierarchy tab, and two, you should now see a cube in the Scene tab/viewer. | ||
[[File:cubeInHierarchy.png]] [[File:cubeInScene.png|500px]] | [[File:cubeInHierarchy.png]] [[File:cubeInScene.png|500px]] | ||
| Line 71: | Line 77: | ||
[[File:cubeInInspector.png]] | [[File:cubeInInspector.png]] | ||
| − | Manipulating things in this tab is very important, for example it allows | + | Manipulating things in this tab is very important, for example it allows you to move, rotate, or scale the object in a more fine-tuned manner. This can also be achieved in the Scene tab, when you have an object selected you can move, rotate, or scale it along the x, y, or z axes by adjusting the red, green, or blue axes respectively. |
| − | Some tips | + | Some tips and shortcuts for object manipulation in Scene view: |
| − | * | + | * W brings up the handles for positioning, E is for rotation, and R is for scaling. |
| − | * T | + | * T will display a square with a small circle in the middle which lets you move the object around wherever the mouse is, and you can also scale from corners or sides of the object individually. This is instead of scaling from the center point of the object on the axis you're working with, which is how it usually works. |
* Q just lets you move around the scene in the view, which can be very useful. | * Q just lets you move around the scene in the view, which can be very useful. | ||
* F focuses in on whatever object you have selected. | * F focuses in on whatever object you have selected. | ||
Revision as of 18:02, 22 May 2017
Please Note: This page is a work in progress and may not be 100% correct or complete. If you have any questions or need for clarification please ask! Questions are welcome and will help make this guide better. There is no need for coding knowledge to do any of the things listed in this part of the guide.
Contents
Starting a new world
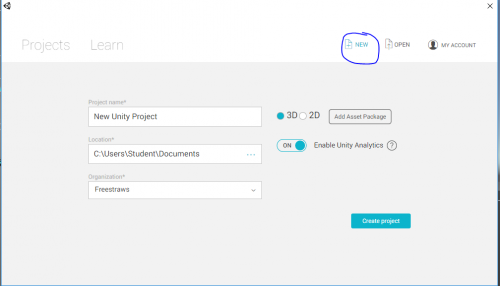
To make a Unity account go to https://unity3d.com. You will need to sign in with a Unity account to start. Once you've done this, click on 'New' in the upper right. You will see this:
Name your project whatever you want in the Project Name field, and pick a save location for the project. This tutorial is for making a 3D game, so select that option if it isn't already selected. You don't need to worry about Asset Packages or Unity Analytics yet. Now you can press 'Create project'.
After everything loads, you might see a pop-up asking if you'd like to update Unity, it's recommended that you just do that.
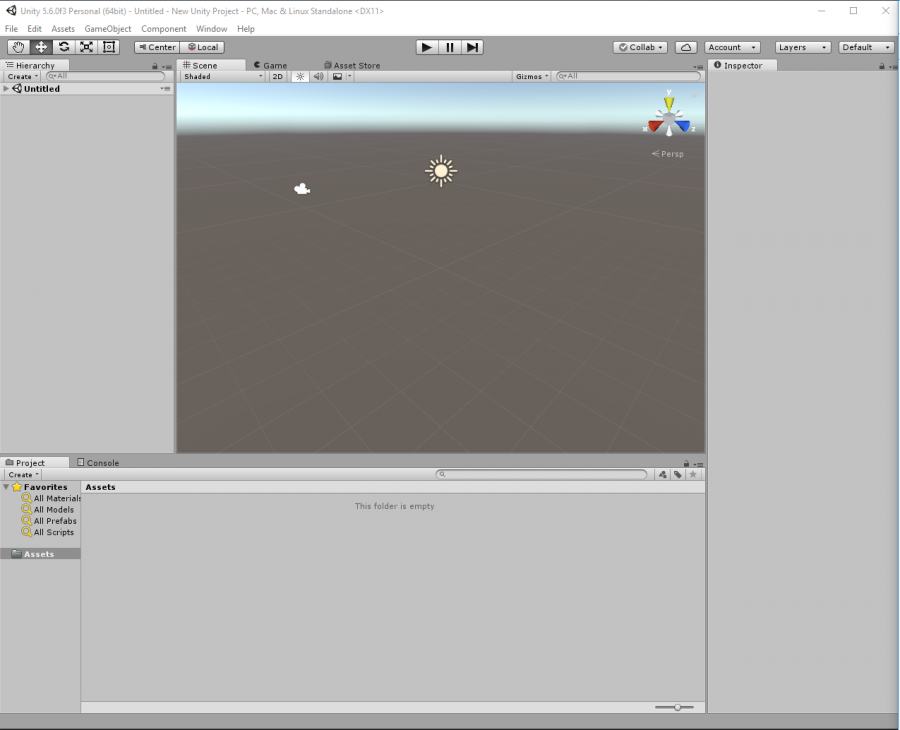
You should now be looking at something like this:
Overview of editor and various tabs
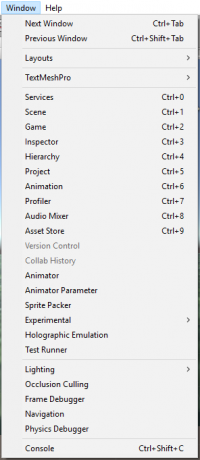
The following is a list of all the UI tabs you might have to deal with:
I'm only going to talk about the most important tabs here, but feel free to look up the others and explore.
Scene
This is where you can edit everything the player sees in the game, like objects' positioning, rotation, and scaling.
Game
The view that lets you test out gameplay. It shows the initial view of the main camera. It is almost useless until you press play, at which point you will be able to move around the world and interact with objects as a player would.
Inspector
Lets you see relevant information about whatever you have selected, be it a Game Object, script, Material, model, etc.
Hierarchy
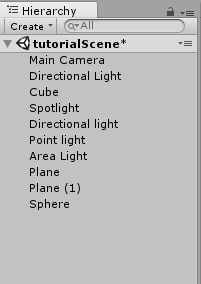
A textual list of all the objects in the scene which also lets you see how each object is connected.
Project
Shows all the non-hidden files in your project's Assets folder, located at the memory address you chose when you created the project.
Asset Store
You will mostly learn about the asset store when it is mentioned in relation to manipulating and importing objects, but this is really useful if you aren't able to make every single asset yourself, or just want something to test with temporarily.
Console
This is where debug messages, warnings, and errors in the code will inevitably be shown with some relevant details.
There are four buttons on the left that help organize this tab:
- Clear just deletes all the messages in the log.
- Collapse means that for identical messages only a single message is displayed, and a number to the left of the message increases by one when the same message appears again. This can make the console easier to read but doesn't necessarily keep the order in which the messages happened.
- Clear on Play means the console log gets cleared out once you press play so you don't see the messages from previous tests and get confused.
- Error Pause means that if an error comes up after you've pressed play, it will pause the game so that no further errors are generated and you can see what's gone wrong.
The buttons on the right let you filter between debug messages, warnings, and errors; which can be useful but usually just keeping them all turned on is best.
Placing objects in a scene
Primitive 3D objects
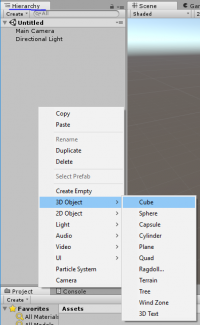
There are two ways to place primitive 3D shapes in a scene, with the first steps being different: one starts with right-clicking in the Hierarchy tab. The other way is almost the same but starts with selecting GameObject at the top of the screen.
(The first way is shown below)
The second step is the same for both: go to 3D Object and choose the shape you want.
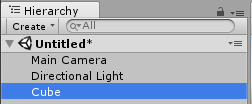
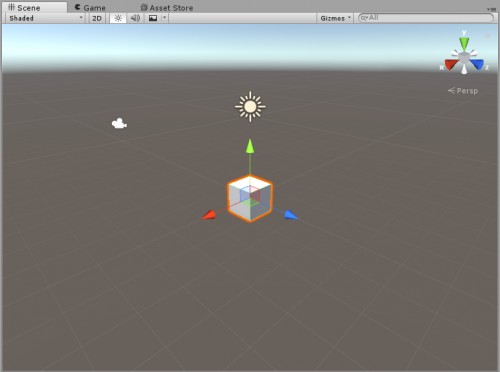
If you pick cube, as shown in the image above, two things happen: one, a cube is added to the lists of objects in the hierarchy tab, and two, you should now see a cube in the Scene tab/viewer.
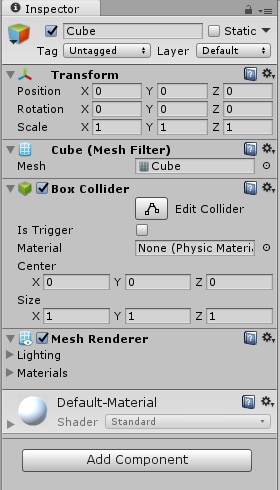
If the cube has an orange outline, as shown in my scene tab, there should also be some new information in the Inspector tab.
Manipulating things in this tab is very important, for example it allows you to move, rotate, or scale the object in a more fine-tuned manner. This can also be achieved in the Scene tab, when you have an object selected you can move, rotate, or scale it along the x, y, or z axes by adjusting the red, green, or blue axes respectively.
Some tips and shortcuts for object manipulation in Scene view:
- W brings up the handles for positioning, E is for rotation, and R is for scaling.
- T will display a square with a small circle in the middle which lets you move the object around wherever the mouse is, and you can also scale from corners or sides of the object individually. This is instead of scaling from the center point of the object on the axis you're working with, which is how it usually works.
- Q just lets you move around the scene in the view, which can be very useful.
- F focuses in on whatever object you have selected.
- ctrl-D duplicates the selected object.
- Right-clicking and moving the mouse allows you to rotate your view in the scene. Ctrl middle-click allows translation of the camera position.
Lights
To add a light to a scene, you would go to GameObject > Light and select one of the following kinds of lights to add:
Spotlight: Exactly like it sounds, it's a cone of light for which you can specify the spot angle, range, intensity, and color. There are of course other setting you can see in the inspector but those 4 are the most important. All of these can be adjusted based on variables with scripting. Light doesn't really go past the given range, even when you might feel like it should. Spot angle corresponds to how wide you want the cone of light to be. Intensity is a range of how bright the light is, 0 being that it emits no light, and 1 being the brightest it can possibly be.
Point light: Very similar to the spotlight except that instead of the light brightening an area in a cone shape, point lights are a sphere of light going from the center of the object to the specified radius in every direction.
Directional light: typically used for lights that affect an entire scene, like a sun or moon. There is no range for this type of light because it's meant to be global. If you want shadows, pick Shadow Type > Soft Shadows (or Hard Shadows, try them both and decide which on is better for your project). You usually only want to have 1, or 2 if you want something like a day/ night cycle, of these in a scene.
Area light: This one is not used nearly as often as the 3 above, but for lighting rooms evenly this can be an extremely useful tool.
A more thorough explanation of lighting in Unity.
Models from your project assets
Asset Store
If you don't already have any assets you want to use and aren't good at 3d modeling, or just want a base asset to edit, I'd highly suggest looking in the Asset Store (you can get to it by going to Window > Asset Store). It has a huge variety of useful scripts, 3d models, audio clips, textures, and shaders, many of which are free. Some assets do cost money, so be mindful of this, read the reviews, look at how frequently it gets been updated, and if it is okay with the your version of Unity. If you do decide to buy an asset, it will be available for any project you decide to do with Unity, and can be imported to other programs too, if you want.
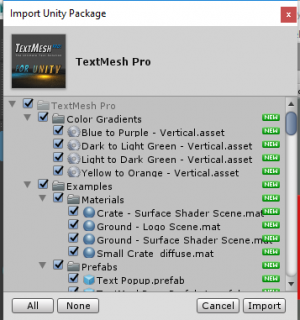
Once you've selected an asset, you can download it from the store window, and then Unity will ask you what parts you'd like to import, it defaults to all but you can deselect folders or specific items from the package.
If you have a model you'd like to import into Unity without the Asset Store, the easiest way to do so is to just drag it from your file manager into the Project tab, which is by default placed below the Hierarchy and Scene + Game tabs. Once you have a model of the right format (see here for a list of Unity compatible file types) find it in the Project tab, and drag it into the Scene or into the Hierarchy. Make sure you know the difference between Scene view and Game view! You can only change things in Scene view, but the Game tab allows you to test how the game actually plays. I will be talking about both of these more later in this guide.
Parent/child hierarchy
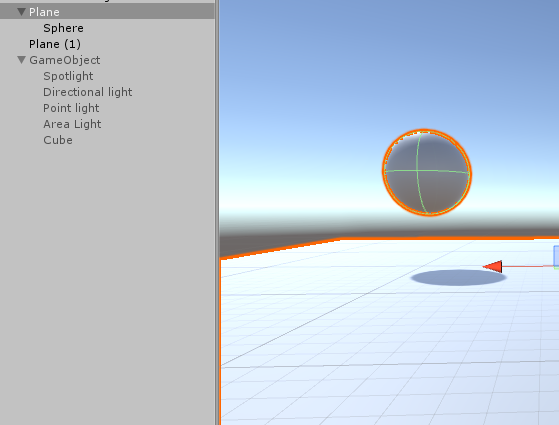
To make an object the child of another, all one has to do is drag the chosen child object in the Hierarchy to the name of the chosen parent object (again in the Hierarchy, this is the only place other than in scripting, that this can be done). Now you might be asking what the point of a parent child object relationship, and aside from organization purposes, child objects keep their position, rotation, and scale in relation to their parent object. So when you move around a parent, the child stays in its relative position from the parent object. See how, in the image below, even if I only have Plane selected in the hierarchy, it looks like both the plane and the sphere are selected in scene view?
This is called local positioning. When an object has no parent it still has a local position, but it is the same as its global position, because every object is a child of the scene or world itself. This becomes important later because you may want to change an object's relative position to a parent and not the global, or maybe you want to edit both, but just make sure you know the difference between an object's local, or relative position and global position. If an object is a child object, the Transform (meaning the position, rotation, and scale) is relative, or local, to the parent object. The same goes for rotation and scale, although you usually only want to change local scale, changing an object's global scale is never a great idea.
How to test things out
If you don't already have a folder labeled 'Standard Assets' in your project tab, or if you look in that folder but don't see the 'Characters' folder, then in your project tab right-click and go to 'Import Package' > 'Characters'.
In the Characters folder (in Standard Assets), go to FirstPersonCharacter > Prefabs and drag RigidBodyFPSController from that folder into the scene somewhere on top of a plane or a cube, or any object you already have in the scene. When you press play in the next step you will be able to see the world from the point of view of that Controller, and even walk and jump around using W,A,S,D and the Space Bar respectively. You can also change the position in which the player starts the game by moving this controller around in the scene.
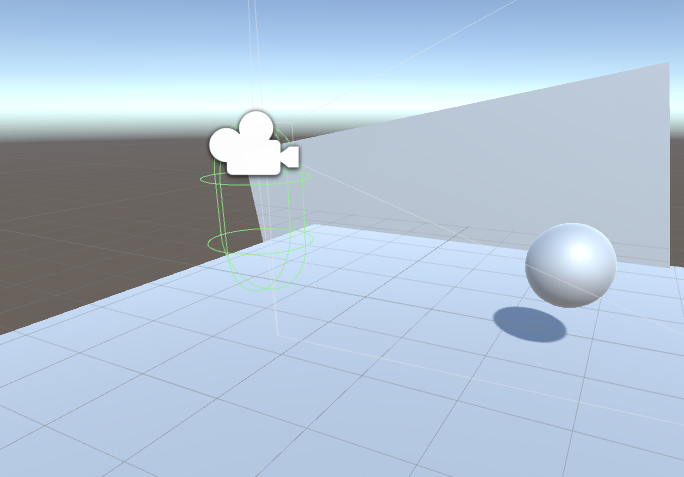
The camera icon seen in the image above represents what you, or the player, sees. The gray lines extending from that camera show the angles of where the player can see and how far away they can see things. Those can also be adjusted if you find the child object of the controller (if an object has any children they can be seen in the hierarchy by pressing the triangle next to the parent name) called Main Camera. Then make adjustments to Field of View or Clipping Planes (for changing maximum view distance). There are plenty more options to explore in there t
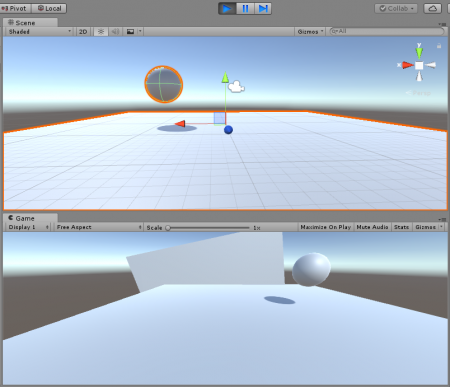
 That play button allows you to test everything you've made so far!
If Scene and Game are in the same window space, as above, Unity will automatically switch you from Scene to Game. You are still able to edit everything you were able to while not in play mode, so I usually keep Scene and Game in separate areas next to each other to more easily test things. You can drag the tabs/ windows wherever you want by picking them up by their title. To leave this mode to return to editing, click the, now blue, play button. If you can't see your mouse, that's probably fine, just press ESC and it will appear.
If you walk your controller off of the platforms you've created, you will fall infinitely into the void, and if you do that my suggestion is just to leave play mode and try again.
Play versus edit mode
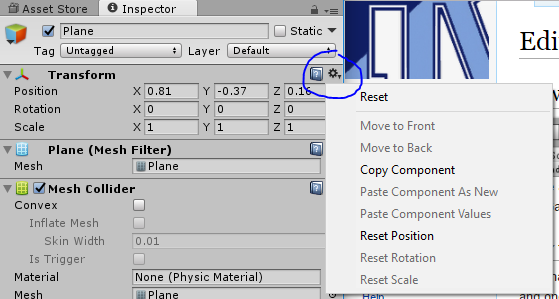
Any changes you make to the world or its objects while in play mode will not get saved! Please keep this in mind. One way around that that I've found is to copy the edited object while in play mode and once you've gone back to edit, you can paste the edited version in and delete the original. As an alternative you can also copy individual aspects of an object (such as the Transform which contains position, rotation, and scale) by finding the relevant part in the Inspector, and clicking the little gear at the top right of every part, which are otherwise known as Components.
Note: Changes to scripts are not affected by this limitation, but if you change a script while in play and save it, Unity will reload all its scripts, not just the one you edited, and this may break things, especially things that should only happen when the game first starts up.
