Difference between revisions of "Materials"
m |
m |
||
| Line 10: | Line 10: | ||
[[File:newMaterial.png|200px]] | [[File:newMaterial.png|200px]] | ||
| + | |||
| + | You can then drag that material onto an object in the scene tab, or its name in the Hierarchy, to have it take on that material. | ||
[https://docs.unity3d.com/Manual/Materials.html More detailed guide to materials in Unity] if you want to know more. | [https://docs.unity3d.com/Manual/Materials.html More detailed guide to materials in Unity] if you want to know more. | ||
| − | (Next part doesn't exist yet, but will be here) | + | (Next part doesn't exist yet, but will be linked here) |
Revision as of 10:24, 4 May 2017
If you haven't already, please read the previous part of this Unity tutorial.
This is where you're gonna learn how to apply textures to things!
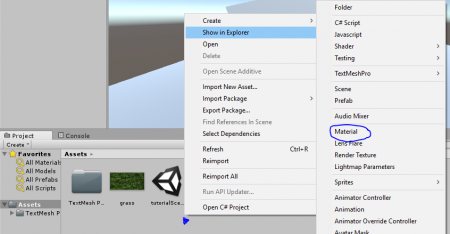
Say you found this great grass texture  online somewhere and now you want to use it your game for some reason. You can either drag it into the Project tab from your file manager or downloads or wherever, or you can save it directly to your Unity assets folder (located wherever you told Unity to make your project, and it's the folder called Assets) which is arguably much faster. Once you have the texture, you can't just directly apply it to an object. First you must make a material. Right-click within the Project view to start. Go to Create and there you should find and click Material.
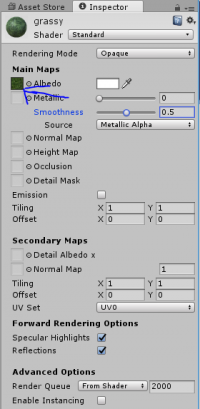
Once the new material is made, drag your chosen texture to where it says Main Maps > Albedo. You can also press the little circle with a dot in the middle to see all the textures you have access to in your assets (most of which will probably be from Unity's standard assets).
You can then drag that material onto an object in the scene tab, or its name in the Hierarchy, to have it take on that material.
More detailed guide to materials in Unity if you want to know more.
(Next part doesn't exist yet, but will be linked here)

