Difference between revisions of "Cube 3D Printers"
(Changed the numbering under Printing a .CUBE file.) |
|||
| Line 40: | Line 40: | ||
#Once you have saved your design to a flash drive, you can now print it using the Cube 3D printers. Bring your flash drive to one of the Cube 3D printers located at the back of the room facing the entrance. Press the power button on the top of the printer next to the screen to turn the printer on. With the printer on, plug your flash drive into the side of of the printer, and the screen should display two icons, "Print" and "Setup." If there is no display, tap the screen. | #Once you have saved your design to a flash drive, you can now print it using the Cube 3D printers. Bring your flash drive to one of the Cube 3D printers located at the back of the room facing the entrance. Press the power button on the top of the printer next to the screen to turn the printer on. With the printer on, plug your flash drive into the side of of the printer, and the screen should display two icons, "Print" and "Setup." If there is no display, tap the screen. | ||
| − | |||
#Once you see the display, tap "Print." The screen should now display a list of all of the .CUBE files saved on your flash drive. If instead you're being prompted to do an auto-calibration, select skip until you see a display of the .CUBE files. You can choose between files by tapping on the left and right arrows on the screen, and once you've located the file you wish to print, tap "print." | #Once you see the display, tap "Print." The screen should now display a list of all of the .CUBE files saved on your flash drive. If instead you're being prompted to do an auto-calibration, select skip until you see a display of the .CUBE files. You can choose between files by tapping on the left and right arrows on the screen, and once you've located the file you wish to print, tap "print." | ||
| − | |||
#Before continuing, make sure you apply glue to the square plate in the Cube 3D printer. Only apply glue to where your object will be printed, so that the filament sticks to the surface of the plate. You may want to remove the plate to apply the glue. | #Before continuing, make sure you apply glue to the square plate in the Cube 3D printer. Only apply glue to where your object will be printed, so that the filament sticks to the surface of the plate. You may want to remove the plate to apply the glue. | ||
| − | |||
#If your design is a different color than the loaded filament, ( you can see the filament color by looking at the sides of the printer) select "confirm" to continue the print using the color loaded on the Cube 3. | #If your design is a different color than the loaded filament, ( you can see the filament color by looking at the sides of the printer) select "confirm" to continue the print using the color loaded on the Cube 3. | ||
| − | |||
# When prompted to apply glue to the plate, tap the check symbol and continue with the print. | # When prompted to apply glue to the plate, tap the check symbol and continue with the print. | ||
Revision as of 14:12, 9 January 2017
Contents
Printing with Cube 3D printers
The cube 3D printer builds physical objects from digital .CUBE files.
Creating a .CUBE file
On any of the available computers in the _Space, locate the app titled "Cube Print" (this should be easily found on the desktop). Once the app is open, choose "ADD" on the upper left of the application screen. From here, you can import any .stl or .obj file.
After your file has been imported, you can select it on the application screen, and press "Print Now."
- Note: You cannot edit a .CUBE file. If your file is already a .CUBE file, you can press "Export" but you cannot press" Print Now"
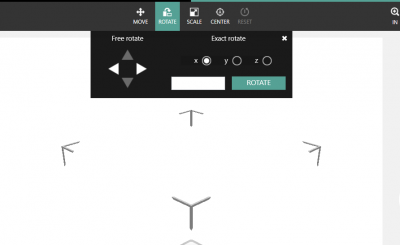
In the Editing screen, you can apply any necessary changes, such as moving, rotating, scaling or centering the object. To do this, first select your object, and and click any of the options located above your design.
To Choose Specific Colors
Select one or both of the color wheels, located on the left and right of the screen. Each side corresponds to the respective side of the 3D printer nozzles. Choose the color you desire, select set, and the color wheel should have changed. Now, click and hold on the wheel, and drag the color to the desired location in order to apply the new color.
- Note: You can select colors from either left or right side, whichever side you select, the project will print entirely that color.
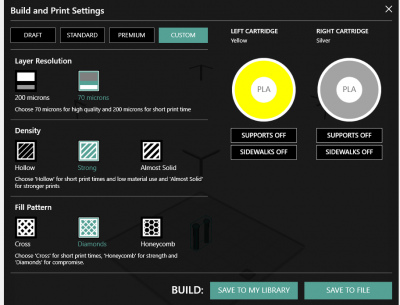
When you're ready to print your design, select "Build." This will open the "Build and Print Settings" page, the following is a list of settings you can change:
- Layer Resolution
- Density
- Fill pattern
- Apply supports if necessary (selecting it from the correct color and location.)
After you've finished editing your settings, select "Save to File" and save your project directly to your flash drive. Allow some time for the file to be converted and saved, the application should generate a message saying, “Gathering print file. Please wait.” Once this has finished, you'll receive a message that reads "Your file was saved successfully."
Printing a .CUBE file
- Once you have saved your design to a flash drive, you can now print it using the Cube 3D printers. Bring your flash drive to one of the Cube 3D printers located at the back of the room facing the entrance. Press the power button on the top of the printer next to the screen to turn the printer on. With the printer on, plug your flash drive into the side of of the printer, and the screen should display two icons, "Print" and "Setup." If there is no display, tap the screen.
- Once you see the display, tap "Print." The screen should now display a list of all of the .CUBE files saved on your flash drive. If instead you're being prompted to do an auto-calibration, select skip until you see a display of the .CUBE files. You can choose between files by tapping on the left and right arrows on the screen, and once you've located the file you wish to print, tap "print."
- Before continuing, make sure you apply glue to the square plate in the Cube 3D printer. Only apply glue to where your object will be printed, so that the filament sticks to the surface of the plate. You may want to remove the plate to apply the glue.
- If your design is a different color than the loaded filament, ( you can see the filament color by looking at the sides of the printer) select "confirm" to continue the print using the color loaded on the Cube 3.
- When prompted to apply glue to the plate, tap the check symbol and continue with the print.
Once this is finished, the printer will heat up, and print your design.
- In the event of an error, for example T12, turn off the Cube 3 and unplug it from the power source. Wait a few minutes, check to make sure the filament nozzle is properly inserted and (the dots are aligned) plug the Cube 3 back in, and turn it on.
Loading Filament
- Power on the Cube 3
- Select the settings option and choose "Change Cartridge."
- Now select which cartridge to change, the left or the right. After you finish this step, the printer should begin to heat up.
- Once the printer has finished heating, it should prompt you to do the following:
- Remove the cartridge. When prompted, press in the two prongs located on the middle of the cartridge and pull out (Select the checkmark to continue).
- Rotate the print jet and pull out. This is located on the top of the Cube 3. (Select the checkmark to continue).
- Print jet and rotate. Once inserted, rotate the print jet until both dots are aligned and it feels secure (Select the checkmark to continue).
- Insert the cartridge. Simply align the cartridge on the proper side and push it in until it has clicked into place (Select the checkmark to continue).
- The printer will begin registering the new cartridge and heat up (about 2.5 minutes) and from there it will begin priming. Once complete, the printer will begin to cool and is now ready to begin a print job (about 2 minutes).

