Difference between revisions of "3DP Workbench"
From __space Wiki
| (9 intermediate revisions by 4 users not shown) | |||
| Line 1: | Line 1: | ||
| − | The 3D Platform | + | The 3D Platform Workbench is a large format 3D printer, that uses FFF (Fused Filament Fabrication) additive manufacturing |
'''Jobs run on the Workbench must be reviewed by __space staff prior to printing.''' | '''Jobs run on the Workbench must be reviewed by __space staff prior to printing.''' | ||
== Capabilities == | == Capabilities == | ||
| − | * 1 meter x 1 meter | + | *Build Area: 1 meter x 1 meter |
| − | * | + | *Filament: 1.75 mm or 3 mm (3mm recommended) |
| − | * | + | *Nozzle Diameter: 0.6 mm |
| + | *Max. Nozzle Temp: 295 °C | ||
| + | *Max. Print Bed Temp: 145 °C | ||
| + | *Materials: PLA, PETG, ABS, NinjaFlex, nylon, T-Glase, HIPS, PVA, etc. | ||
| + | *Down to a 70 micron (0.0027") resolution | ||
== How to use == | == How to use == | ||
| − | # Prepare a [[.gcode]] file | + | #Prepare your 3D Image file (.stl, .obj., etc.) by using a Slicer program like [[Simplify_3D]] to output the proper [[.gcode]] file |
| − | # Save [[.gcode]] file to an SD card and then insert SD card into slot on printer | + | #Use settings for the 3DP Workbench. [[Simplify_3D]] has a profile prepared that may be applied to most 3D file types. |
| − | # Power on printer by setting the power switch on the back right side to | + | #Save [[.gcode]] file to an SD card and then insert SD card into slot on printer |
| − | # | + | #Confirm the correct filament is inserted into the correct sized nozzle |
| − | # | + | #Power on printer by setting the power switch on the back right side to "I", then pressing the "I" button on the front panel of the Workbench. |
| + | #Once the display has powered on, click the dial to enter the menu | ||
| + | #Scroll down using the dial, and click to select "Print from SD" | ||
| + | #Scroll down to your print file, and click to select the file | ||
| + | #Once the bed and nozzle reach the desired temperatures, your print will start automatically | ||
| + | #Monitor the first few layers of your print to ensure it sticks to the bed, this is where most errors occur during the print. | ||
| + | [[File:Typical Workflow.jpeg]] | ||
| − | + | Here is the FFF file for our [[Media:WB 1.2mm Settings.fff|1.2 nozzel]] | |
| − | * | + | == Troubleshooting/Common Problems == |
| + | *Filament not sticking to bed | ||
| + | *Holes or uneven layers | ||
| + | *This printer is best utilized for less detailed, large prints (compared to smaller desktop printers) | ||
| − | == | + | == Tips & Tricks == |
| + | *Apply a quick spray of Hair Spray onto the section of the build plate you will be printing on to assist with the filament adhering to it. | ||
| + | *Increase Infill or Decrease speed for more accurate prints | ||
| + | *If your print is too detailed for this printer, but too large for the desktop printers, split up your 3D Image into several pieces (ask for help) | ||
| − | + | == 3D Print Statistics== | |
| + | [[File:3DPrintStats.png]] | ||
| + | [https://theconfig.com/PCM/ConfiguratorContent/Infolinks/PDFs/3DPrinter_Statistics.PDF] | ||
== Links == | == Links == | ||
[https://3dplatform.com/ 3D Platform Official Website] | [https://3dplatform.com/ 3D Platform Official Website] | ||
| + | [https://theconfig.com/PCM/ConfiguratorContent/Infolinks/PDFs/3DPrinter_Catalog.PDF] | ||
| + | |||
| + | == Electrical == | ||
| + | Standard AC Input: | ||
| + | *220-250V Print Bed & Printer Control | ||
| + | *15A | ||
| + | *60 Hz or 50 Hz | ||
Latest revision as of 11:22, 23 April 2018
The 3D Platform Workbench is a large format 3D printer, that uses FFF (Fused Filament Fabrication) additive manufacturing
Jobs run on the Workbench must be reviewed by __space staff prior to printing.
Contents
Capabilities
- Build Area: 1 meter x 1 meter
- Filament: 1.75 mm or 3 mm (3mm recommended)
- Nozzle Diameter: 0.6 mm
- Max. Nozzle Temp: 295 °C
- Max. Print Bed Temp: 145 °C
- Materials: PLA, PETG, ABS, NinjaFlex, nylon, T-Glase, HIPS, PVA, etc.
- Down to a 70 micron (0.0027") resolution
How to use
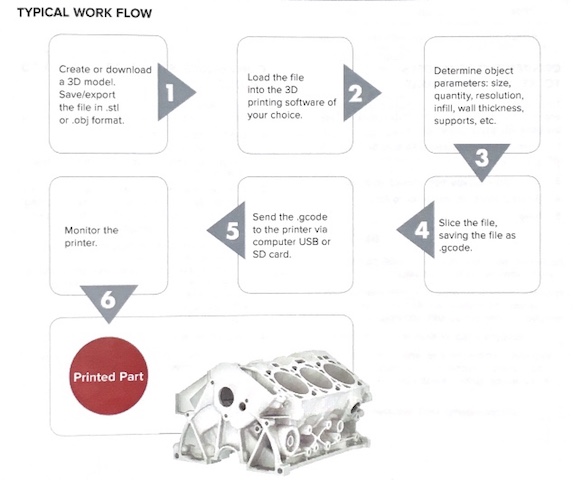
- Prepare your 3D Image file (.stl, .obj., etc.) by using a Slicer program like Simplify_3D to output the proper .gcode file
- Use settings for the 3DP Workbench. Simplify_3D has a profile prepared that may be applied to most 3D file types.
- Save .gcode file to an SD card and then insert SD card into slot on printer
- Confirm the correct filament is inserted into the correct sized nozzle
- Power on printer by setting the power switch on the back right side to "I", then pressing the "I" button on the front panel of the Workbench.
- Once the display has powered on, click the dial to enter the menu
- Scroll down using the dial, and click to select "Print from SD"
- Scroll down to your print file, and click to select the file
- Once the bed and nozzle reach the desired temperatures, your print will start automatically
- Monitor the first few layers of your print to ensure it sticks to the bed, this is where most errors occur during the print.
Here is the FFF file for our 1.2 nozzel
Troubleshooting/Common Problems
- Filament not sticking to bed
- Holes or uneven layers
- This printer is best utilized for less detailed, large prints (compared to smaller desktop printers)
Tips & Tricks
- Apply a quick spray of Hair Spray onto the section of the build plate you will be printing on to assist with the filament adhering to it.
- Increase Infill or Decrease speed for more accurate prints
- If your print is too detailed for this printer, but too large for the desktop printers, split up your 3D Image into several pieces (ask for help)
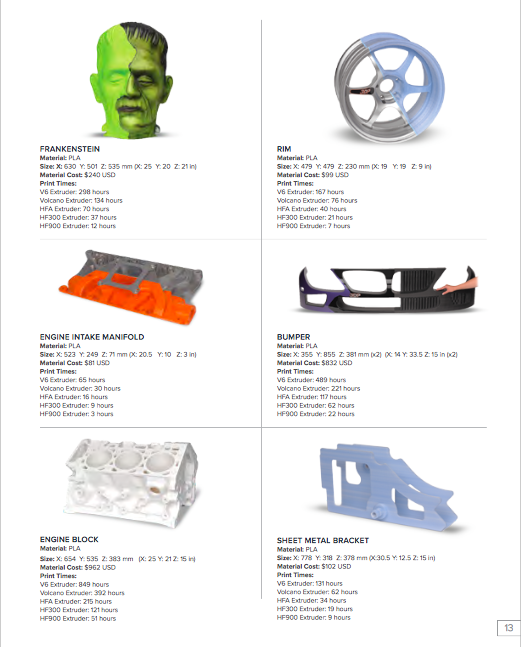
3D Print Statistics
Links
3D Platform Official Website [2]
Electrical
Standard AC Input:
- 220-250V Print Bed & Printer Control
- 15A
- 60 Hz or 50 Hz

