Difference between revisions of "Laser Engraver"
From __space Wiki
(Added setting options and raster vs vector) |
|||
| Line 2: | Line 2: | ||
== GCC Laserpro Spirit LS == | == GCC Laserpro Spirit LS == | ||
| − | The Spirit LS laser engraver from GCC Laserpro is the laser engraver available at '''_Space.URI'''. It can engrave a wide variety of materials including glass, acrylic, wood and plastic. | + | The Spirit LS laser engraver from GCC Laserpro is the laser engraver available at '''_Space.URI'''. It can engrave a wide variety of materials including glass, acrylic, wood, rock, and plastic. |
| Line 13: | Line 13: | ||
#After completing the Laser Pro certification process, you will receive a bag containing accessories necessary to operate the Laser Pro machine. Included in this bag is a pair of safety goggles, you must wear these before using the Laser Pro Spirit LS. | #After completing the Laser Pro certification process, you will receive a bag containing accessories necessary to operate the Laser Pro machine. Included in this bag is a pair of safety goggles, you must wear these before using the Laser Pro Spirit LS. | ||
#Be aware of your surroundings. Near the laser Pro is a fire extinguisher for use if needed. Before using the machine, make sure you are familiar with where the fire extinguisher is located before using the machine. | #Be aware of your surroundings. Near the laser Pro is a fire extinguisher for use if needed. Before using the machine, make sure you are familiar with where the fire extinguisher is located before using the machine. | ||
| + | #The large red button on the Laser Pro acts as an emergency stop button in the case of a fire or other emergency | ||
| + | #Before etching, check to ensure that the SafeGuard is Enabled (or Disabled depending on the material you are cutting) | ||
| Line 25: | Line 27: | ||
::Black & White | ::Black & White | ||
:Pen | :Pen | ||
| − | :: | + | ::Speed |
| − | :: | + | ::Power |
::Turn on 'Air' | ::Turn on 'Air' | ||
| + | ::Check off Raster or Vector depending on your cut | ||
:Advanced | :Advanced | ||
::Position Modes ''(defined)'' | ::Position Modes ''(defined)'' | ||
| Line 33: | Line 36: | ||
:::Center - Laser will etch/cut using the position set manually as the center of the project. | :::Center - Laser will etch/cut using the position set manually as the center of the project. | ||
:::Smart Center - Select the four corners of the material, the machine will find the center. | :::Smart Center - Select the four corners of the material, the machine will find the center. | ||
| + | :Paper | ||
| + | ::Change the dimensions to match the document dimensions (check for units) | ||
| + | :Raster | ||
| + | ::Dithering Matrix | ||
| + | |||
| + | ''Pen Settings'' | ||
| + | |||
| + | :Pen settings allow you to change the speed and power of the laser. The power is the percentage of full (100%) power. The more power, the deeper and darker the etch. Too much power may burn your material or etch too deeply. Changing the pen speed changes the time the pen spends in an area. If you can not use a strong power on a delicate material, try lowing the speed so the laser lingers longer as it etches the surface. Here are some starting pen speeds and powers for different materials. | ||
| + | ::Wood- Speed 40, Power 60 | ||
| + | ::Rock- Speed 20-30, Power 70-80 | ||
| + | |||
| + | ''Vector vs Raster'' | ||
| + | |||
| + | :A raster cut is the default cut the laser uses. This in involves the laser moving back and forth across the surface as well as as it moves down the surface. A raster cut will etch anywhere there is color on an image, and is good for thick designs or designs that are filled in. | ||
| + | :A vector cut traces the lines of an image. The pen moves around the edges of a design. This would be used either to cut something out or to etch delicate line work. A vector cut can be done if the design in made in Corel with the lines set to hairline. An image can be converted to cut in vector by using Convert to Bitmap and then Tracing the image. The pen will the vector cut along the trace. (See Vinyl cutter for tips on Bitmap and Tracing) | ||
'''Steps''' | '''Steps''' | ||
| Line 40: | Line 58: | ||
#Create an image or import one into CorelDRAW | #Create an image or import one into CorelDRAW | ||
#Measure the materials you will be engraving or cutting to determine the size of the image | #Measure the materials you will be engraving or cutting to determine the size of the image | ||
| + | #Change the dimensions of the document to match the dimensions of your working surface | ||
#Using the guide marks in CorelDRAW scale your image to the size required | #Using the guide marks in CorelDRAW scale your image to the size required | ||
#When your image is completed, click the print dialog | #When your image is completed, click the print dialog | ||
| Line 51: | Line 70: | ||
#To ensure that your settings are correct close the lid and press the start button | #To ensure that your settings are correct close the lid and press the start button | ||
#If the mirror head appears to be in the correct drawing space, cancel the print, re-center the mirror head, turn the laser key on and press print again to begin engraving or cutting | #If the mirror head appears to be in the correct drawing space, cancel the print, re-center the mirror head, turn the laser key on and press print again to begin engraving or cutting | ||
| + | #Once your print is complete the laser will recenter itself. If you do not touch your material, you can got over the etch and deepen it by pressing Start again. This can help compensate for lack of power. | ||
Revision as of 10:09, 11 April 2017
GCC Laserpro Spirit LS
The Spirit LS laser engraver from GCC Laserpro is the laser engraver available at _Space.URI. It can engrave a wide variety of materials including glass, acrylic, wood, rock, and plastic.
Before Using the GCC Laserpro Spirit LS
Safety Precautions
To ensure your safety, and that of others in the makerspace, please obey the _Space.URI rules and guidelines, as well as the specific rules for using the Laser Pro machine.
- After completing the Laser Pro certification process, you will receive a bag containing accessories necessary to operate the Laser Pro machine. Included in this bag is a pair of safety goggles, you must wear these before using the Laser Pro Spirit LS.
- Be aware of your surroundings. Near the laser Pro is a fire extinguisher for use if needed. Before using the machine, make sure you are familiar with where the fire extinguisher is located before using the machine.
- The large red button on the Laser Pro acts as an emergency stop button in the case of a fire or other emergency
- Before etching, check to ensure that the SafeGuard is Enabled (or Disabled depending on the material you are cutting)
Using the Laser Pro Spirit LS
Basic Settings
Under Printer Preferences
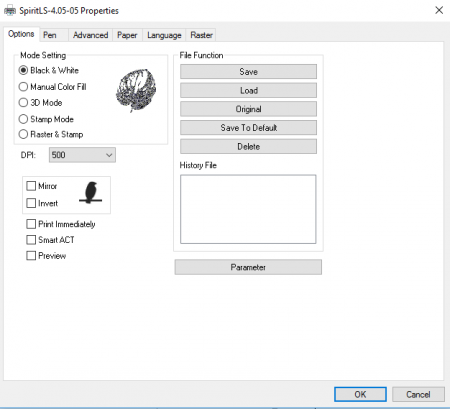
- Options
- Black & White
- Pen
- Speed
- Power
- Turn on 'Air'
- Check off Raster or Vector depending on your cut
- Advanced
- Position Modes (defined)
- Home - Use the top-left corner of the bed as the starting/orientation point.
- Center - Laser will etch/cut using the position set manually as the center of the project.
- Smart Center - Select the four corners of the material, the machine will find the center.
- Position Modes (defined)
- Paper
- Change the dimensions to match the document dimensions (check for units)
- Raster
- Dithering Matrix
Pen Settings
- Pen settings allow you to change the speed and power of the laser. The power is the percentage of full (100%) power. The more power, the deeper and darker the etch. Too much power may burn your material or etch too deeply. Changing the pen speed changes the time the pen spends in an area. If you can not use a strong power on a delicate material, try lowing the speed so the laser lingers longer as it etches the surface. Here are some starting pen speeds and powers for different materials.
- Wood- Speed 40, Power 60
- Rock- Speed 20-30, Power 70-80
Vector vs Raster
- A raster cut is the default cut the laser uses. This in involves the laser moving back and forth across the surface as well as as it moves down the surface. A raster cut will etch anywhere there is color on an image, and is good for thick designs or designs that are filled in.
- A vector cut traces the lines of an image. The pen moves around the edges of a design. This would be used either to cut something out or to etch delicate line work. A vector cut can be done if the design in made in Corel with the lines set to hairline. An image can be converted to cut in vector by using Convert to Bitmap and then Tracing the image. The pen will the vector cut along the trace. (See Vinyl cutter for tips on Bitmap and Tracing)
Steps
- Use the Dell laptop next to the Laser Pro only
- Open the program, CorelDRAW, located on the desktop
- Turn on the Laser Cutter by using the switch on the right side of the machine. Do not turn the laser key until you're prepared to print
- Create an image or import one into CorelDRAW
- Measure the materials you will be engraving or cutting to determine the size of the image
- Change the dimensions of the document to match the dimensions of your working surface
- Using the guide marks in CorelDRAW scale your image to the size required
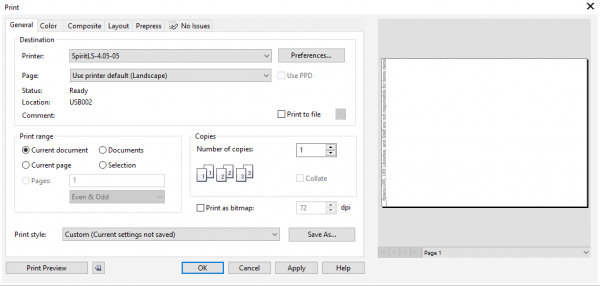
- When your image is completed, click the print dialog
- Under printer choose the Spirit LS as shown below
- Choose properties and set the print settings for your material according to the reference sheet
- After finalizing the software settings, click the print button
- Place your material in the bed of the laser cutter and auto-focus the laser
- Once this is completed, move the mirror head until the red dot is in the center of your drawing space
- To ensure that your settings are correct close the lid and press the start button
- If the mirror head appears to be in the correct drawing space, cancel the print, re-center the mirror head, turn the laser key on and press print again to begin engraving or cutting
- Once your print is complete the laser will recenter itself. If you do not touch your material, you can got over the etch and deepen it by pressing Start again. This can help compensate for lack of power.

